Connecting Ringostat to keyCRM takes just a few steps, and you’ll be able to:
-
Handle calls in keyCRM;
-
See who’s calling;
-
Create customers and orders directly from the call card;
-
View the full call history with call logs.
Step 1. Retrieve the necessary information from your Ringostat account
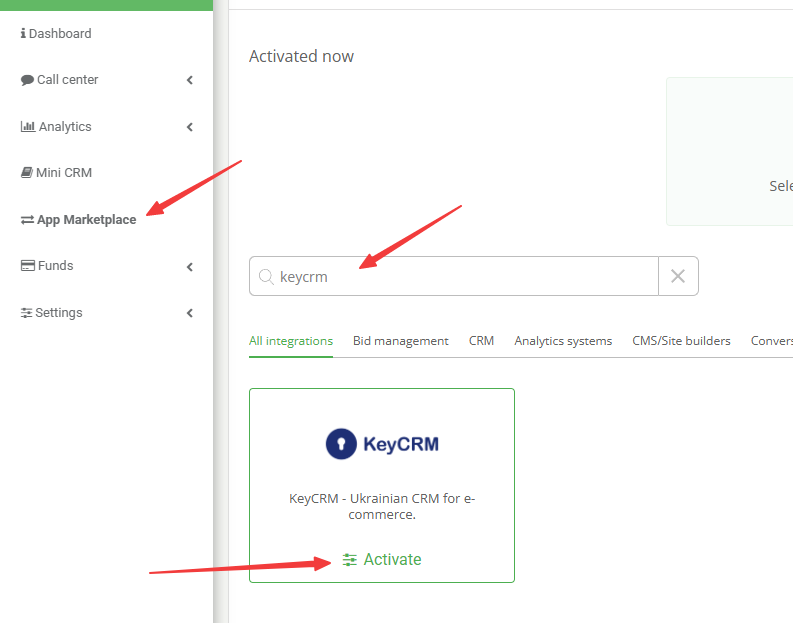
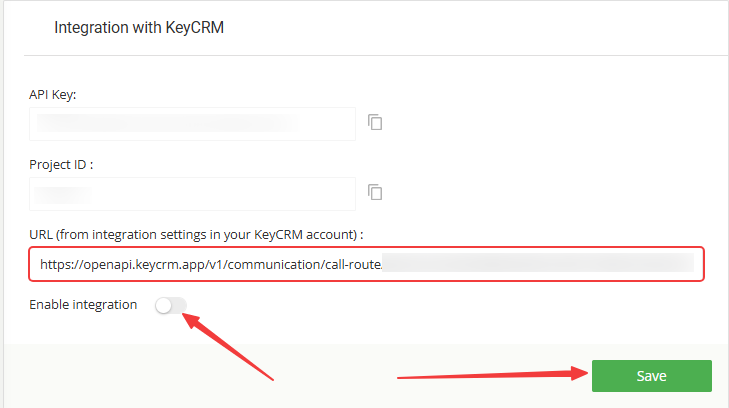
In your Ringostat account, go to the «App Marketplace» section, find «keyCRM», and click «Activate»:
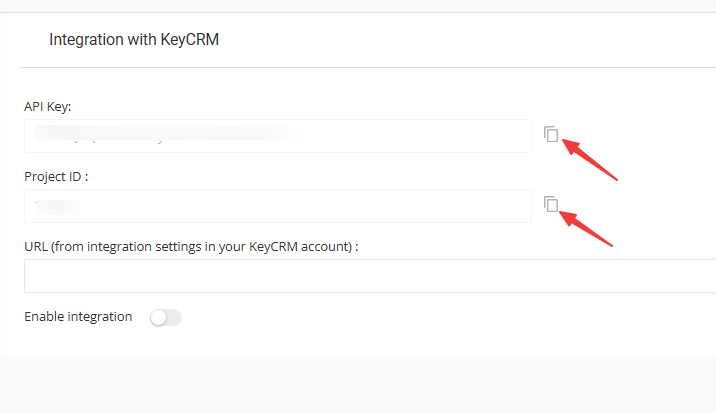
Copy the information from the «API Key» and «Project ID» fields, leave this tab open, and proceed to the next step.
Step 2. Create and configure a call channel in keyCRM
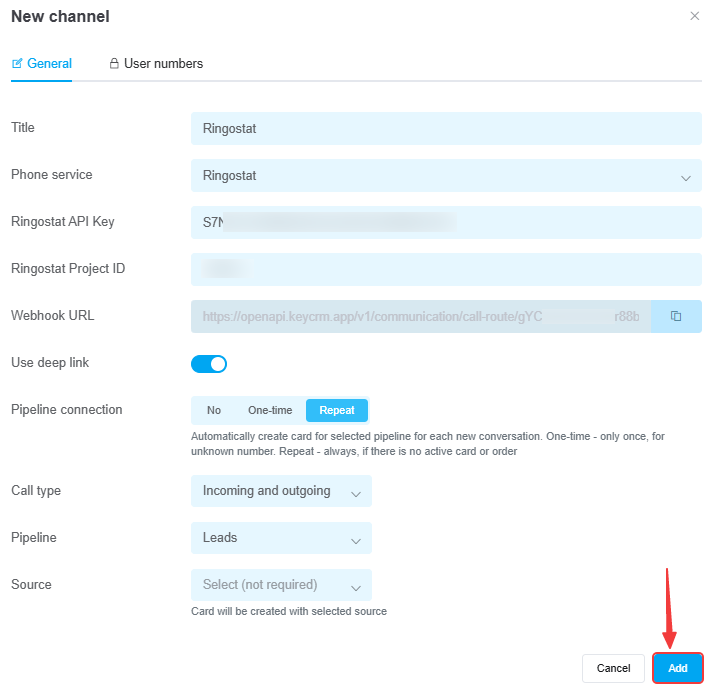
Go to «Settings» → «Communications» → «Calls» tab and click the «Add new integration» button.
In the window that appears, on the «General» tab:
-
Name — Enter the name of the telephony service;
-
Phone service — Select «Ringostat»;
-
Ringostat API Key — Enter the API Key from your Ringostat dashboard;
-
Ringostat Project ID — Enter the Project ID from your Ringostat dashboard;
-
Webhook URL — Copy the URL for further configuration;
-
Use deep link — enable this if you are using a softphone that supports this technology;
-
Connection to pipelines — enable this and select a value:
• No — cards will NOT be created automatically from calls;
• One-time — cards will be created only once, provided there is no existing card with this number;
• Repeat — cards will always be created for repeat calls, provided the number does not have a card in active statuses (all statuses except successful and rejected). -
Call type — select the call type from which cards will be created: only incoming, only outgoing, or all — incoming and outgoing;
-
Pipeline — specify the pipeline for creating cards. If you have only one pipeline, it is selected automatically, and the selection field will not appear;
-
Source — select the source from which the card will be created. If you do not select one, the card will be created with an empty value in the source field.
How the deep link feature works
Deep link – a feature that immediately initiates a call in the device's default app.
How it works:
-
If your device has a default softphone app for calls, and it is active with the deep link feature enabled in the phone settings, tapping «Call» in the CRM will immediately open this app to place a call to the customer.
-
You should enable deep linking only if you use a softphone that supports this technology (for example, MicroSIP or the paid version of Zoiper). If you’re unsure, you can test it. Enable it first; if outbound calls from the CRM don’t work, then disable it.
-
If you disable deep linking, the call will be made through the telephony system itself. First, the CRM sends a request to the telephony system to initiate the call; upon receiving it, the telephony system places the call to the manager’s softphone or IP phone, the manager picks up the phone, and the connection with the client begins.
-
IP phones do not support the deep link feature, so when working with them, it must be disabled.
Step 3. Connecting the managers
Copy the internal employee numbers in your Ringostat dashboard. To do this, go to «General Settings» → «Employees» and open the edit screen for the desired employee:

In the settings window, go to the «User Numbers» tab and fill in the details:
-
Internal number — the manager's SIP account in Ringostat;
-
Manager — the CRM user associated with this number.
The dropdown list will include users who have been granted access to telephony.
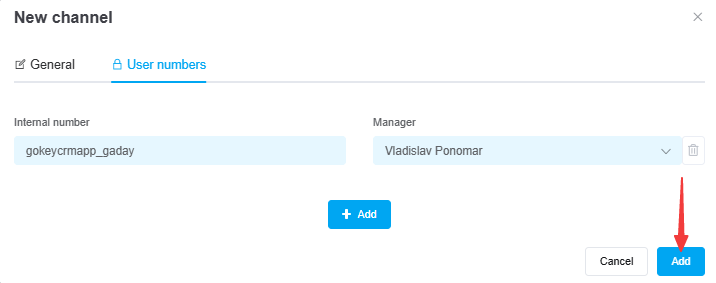
After entering the information, be sure to click «Add» to save the channel and proceed to the next step.
Step 4. Connecting the integration to Ringostat
Go back to the integration settings in your Ringostat dashboard «Step 1», paste the Webhook link you copied earlier, and activate the integration:
Step 5. Add a webhook to forward calls to the customer’s assigned manager
Go to «Settings» → «Virtual PBX» → «Webhook forwarding» and click the «Add webhook forwarding number» button:

In the window that opens, enter a name for the webhook and save it. It will appear on this page; to configure it, click the pencil icon and enter the following information:
-
URL - the link to the webhook from the connection settings in «Step 2»;
-
Data sending method - POST;
-
Data sending type - json;
-
Data receiving type - json;
-
Forwarding number field (for json) - dst_phone;
-
Timeout in seconds - 30;
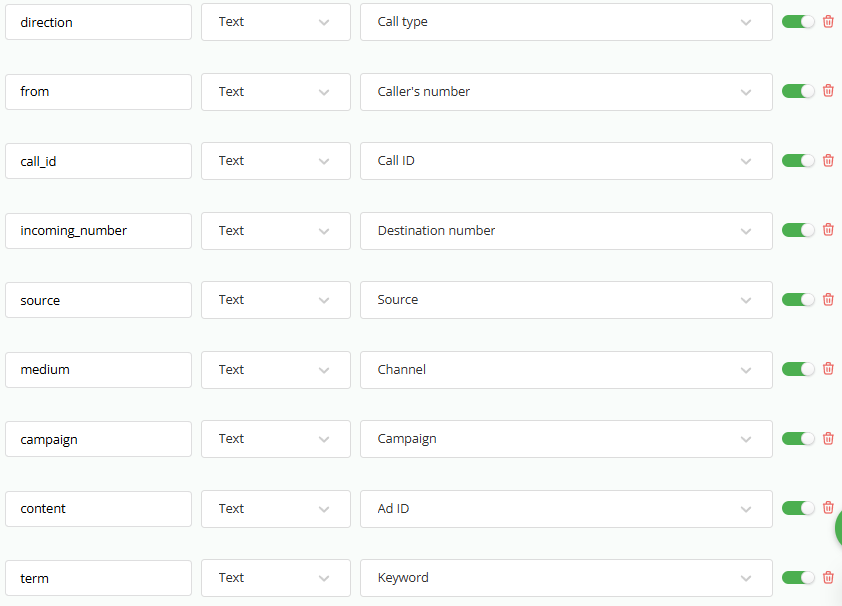
- Configuring Webhook parameters to be sent:
-
from - Subscriber number;
-
direction - Type;
-
state - Ping constant.
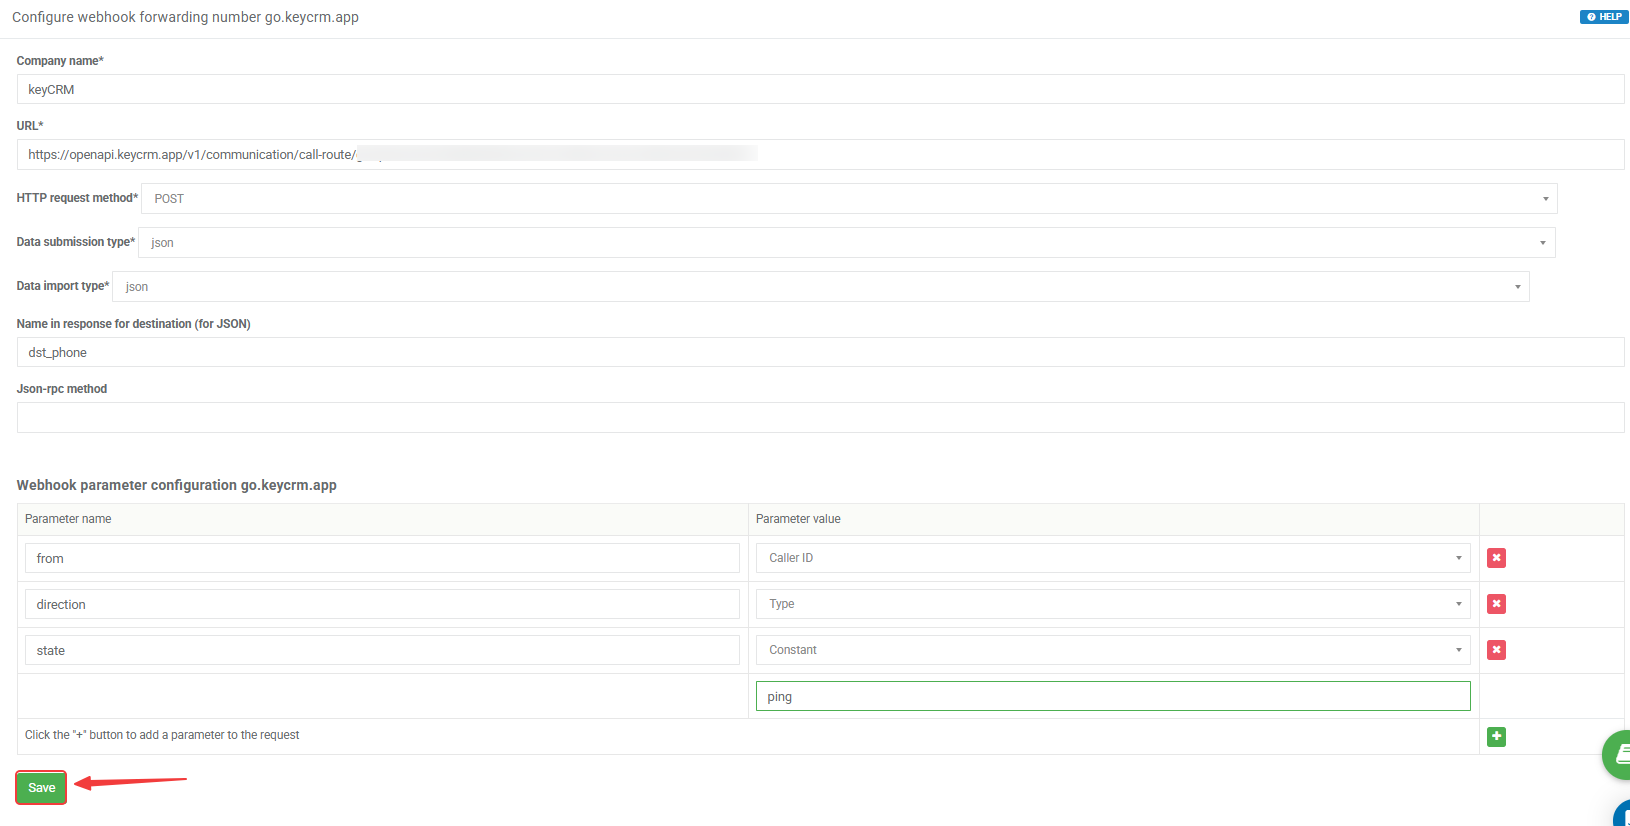
After entering the data, click «Save».
Transmission of information about the pipeline card and the customer
As soon as information about a customer or pipeline card is saved or edited in the CRM, this data will be transferred to Ringostat after the second call (there is currently no real-time synchronization).
In the Ringostat dashboard, the customer data will display the customer’s name if it has been created, or the contact name from the pipeline card if the customer has not yet been registered.
In the Ringostat Smartphone app:
-
The customer's name, if created, or the contact name from the pipeline card, if the customer does not yet exist;
-
A link to the customer in the CRM (if available);
-
A link to the latest pipeline card (if available).
Saving UTM tags from calls
To set up the transmission of tags from your phone system, you need to contact Ringostat support and ask them to configure the transmission of UTM tags in the hooks for the «Pre-call» event:
If an incoming call includes UTM tags, they are saved in:
-
the pipeline card that was created automatically or linked to a call that did not have tags;
-
the pipeline card created from the call card;
-
the order created from the call card.
If multiple cards or orders were created from the call card, the tags will be saved in all of them.
Consequently, they will not be changed in a previously created card or order with tags when a follow-up call is made that has different tags.
You can view reports by tag in the pipeline analytics in summary tables and in the order analytics in summary tables.