Automatic transfer of cards from Google Forms will speed up their processing several times over, eliminating the need to check each response manually. All responses will immediately go to the pipeline section.
Step 1. Creating a script
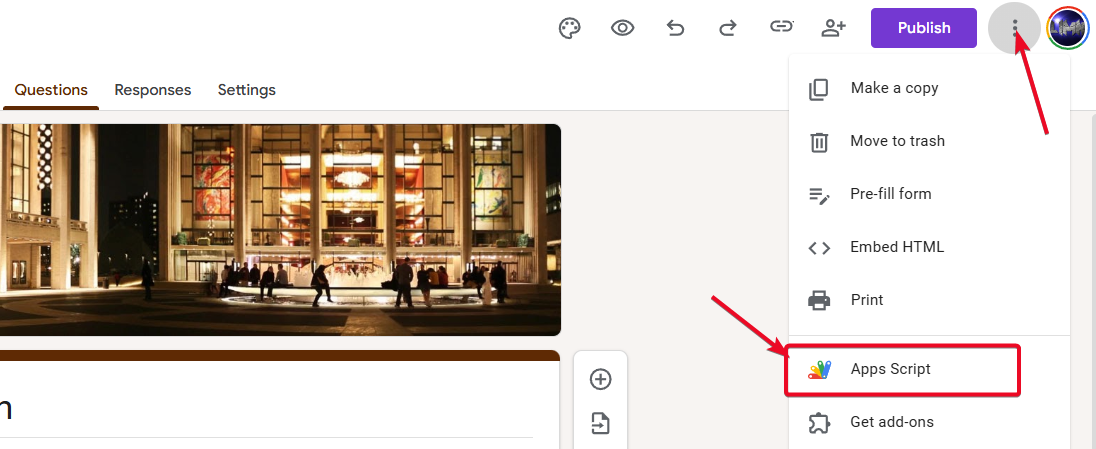
Go to the settings for the desired form and select «Apps Script»:
A new tab will open, where you need to completely delete the code that will be there and paste this one instead:
function myFunction() {
  function KeycrmSendLeads() {
    let form = FormApp.getActiveForm(),
        allResponses = form.getResponses(),
        latestResponse = allResponses[allResponses.length - 1],
        response = latestResponse.getItemResponses(),
        number = allResponses.length;

    let options = {
        'method': 'POST',
        'contentType': 'application/json',
        headers: {
            'Authorization': 'Bearer ' + 'INSERT YOUR API KEY HERE' // Insert the API key from keyCRM
        }
    };

    let payload = {
        'title': form.getTitle()+ ' #' + number,
        'source_id': 141,  // source identifier from keyCRM
        'manager_id': 108, // user profile identifier from keyCRM
        'pipeline_id': 94, // keyCRM pipeline identifier
        'utm_source': 'google-form',
        'utm_medium': 'social_cpc',
        'utm_campaign': 'west-january',
        'utm_term': 'landing page',
        'utm_content': 'pre-registration'
    };

    let contact = {};
    let comment = '';
    let custom_fields = [];

    for (let i = 0; i < response.length; i++) {
        let question = response[i].getItem().getTitle();
        let answer = response[i].getResponse();

        if (question === 'Name' && answer) {
            contact.full_name = answer;
        }

        if (question === 'Email' && answer) {
            contact.phone = answer;
        }

        if (question === 'Organization' && answer) {
            contact.email = answer;
        }

        if (question === 'Are you allergic to any foods?' && answer) {
            comment += 'ALLERGY - ' + answer;
        }

        if (question === 'Additional comments' && answer) {
            comment += '; Additional comments - ' + answer;
        }

        if (question === 'Enter promo code:' && answer) {
            custom_fields.push({ 'uuid': 'LD_1690', 'value': answer.toString() });
        }

        if (question === 'Which day of the event will you be attending?' && answer) {
            // All values are transferred as an array, since this field in CRM is of the list/multilist type.
            custom_fields.push({ 'uuid': 'LD_1689', 'value': Array.isArray(answer) ? answer : [answer] });
        }
    }

    payload['contact'] = contact;
    payload['manager_comment'] = comment;
    payload['custom_fields'] = custom_fields;


    // Payload installation
    options.payload = JSON.stringify(payload);

    try {
        let response = UrlFetchApp.fetch('https://openapi.keycrm.app/v1/leads', options);
        Logger.log("Server response: " + response.getContentText());
    } catch (error) {
        Logger.log("Error sending data to the server: " + error);
    }
}
}
After adding the code, click «Save Project»:

Step 2. Obtaining the keyCRM API key
Go to «Settings» → «General». In the «API Key» field, copy your key:

Step 3. Editing the script
First, you need to configure the basic information:
-
API key: paste the key you copied in the previous step;
-
Source ID in keyCRM: specify the ID of the source with which the cards will be created. Delete the line if not needed;
-
Manager ID: specify the CRM user ID that will be assigned as the manager in the created cards. Delete the line if not needed;
-
Pipeline ID: specify which pipeline the cards should go to. You can leave it blank, in which case just delete the line. The cards will go to the first pipeline;
-
UTM tags: fill in the tags with which the card will be created. Delete all lines if not needed.

Configure the form fields that need to be transferred
Fields with contact information are transferred separately:

Other fields can be transferred to a comment/note on the card. Copy the structure that stores the comment for each field or delete it if you don't need it:

You can create your own fields in the card and transfer data from the form fields directly to them. To transfer data to custom fields, use the custom_fields.push construction, in which you need to specify the system code of the created field.
Example of transferring form responses to a field with the type string/text and list/multilist:

Once you have configured everything, be sure to save your project.
Step 4. Setting up a trigger for card transfer
To ensure that the application is sent automatically as soon as the form is filled out, configure the trigger:
-
Go to the «Triggers» menu item and click the «Add trigger» button;
-
In the window that appears, do not change anything, just select the event type at the very bottom — «On form submit», and click «Save»:

When adding a trigger, an access confirmation window will appear. You need to confirm permission from your Google account:

After that, the cards will be sent to the pipeline immediately after the form is filled out, and you will be able to process them in a single window.