Use Checkbox, a virtual cash register, to fiscalize receipts without any physical hardware. Connect it to keyCRM to issue fiscal receipts directly within your order processing workflow. You can also print receipts or automatically send digital receipt links to your customers straight from the CRM.
Note: If one cash register is connected to multiple CRMs, or if several cash registers are connected within one CRM, instant shift-status updates and receipt retrieval will work only for the most recently connected cash register.
Step 1. Register with Checkbox
If you do not yet have a Checkbox account, create and configure one first.
Checkbox provides detailed, easy-to-follow setup instructions, and the registration process is straightforward.
Note: We recommend uploading your digital signature key to the Checkbox server instead of using the CheckboxSignature app to ensure more stable performance.
Step 2. Register with Checkbox
After registering and configuring your Checkbox account, go to keyCRM Settings → Finance → the «Cash registers» tab, then click Add cash register.
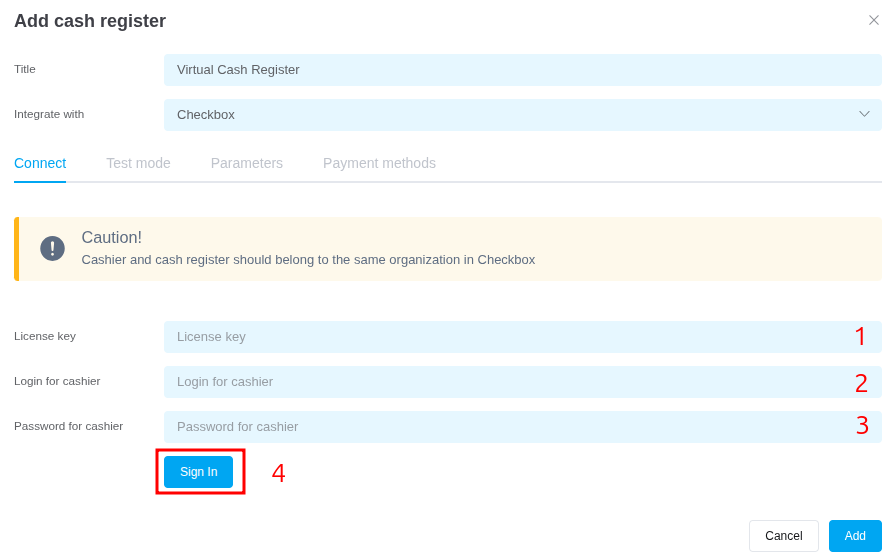
In the window that opens, enter a name for the cash register, select Checkbox as the service, and complete the fields in the Cashier section: (screenshot)
-
Enter the cash register’s license key from Checkbox, available in the Cash Registers section.
-
Enter the Checkbox cashier’s login.
-
Enter the Checkbox cashier’s password.
Note: Enter the cashier’s actual password, not the PIN code used when registering the cashier. -
Click «Sign In». If authorization succeeds, this block disappears. Otherwise, an error message is displayed.
Important: Do not connect multiple cash registers to the same cashier. Create a separate cashier for each cash register.
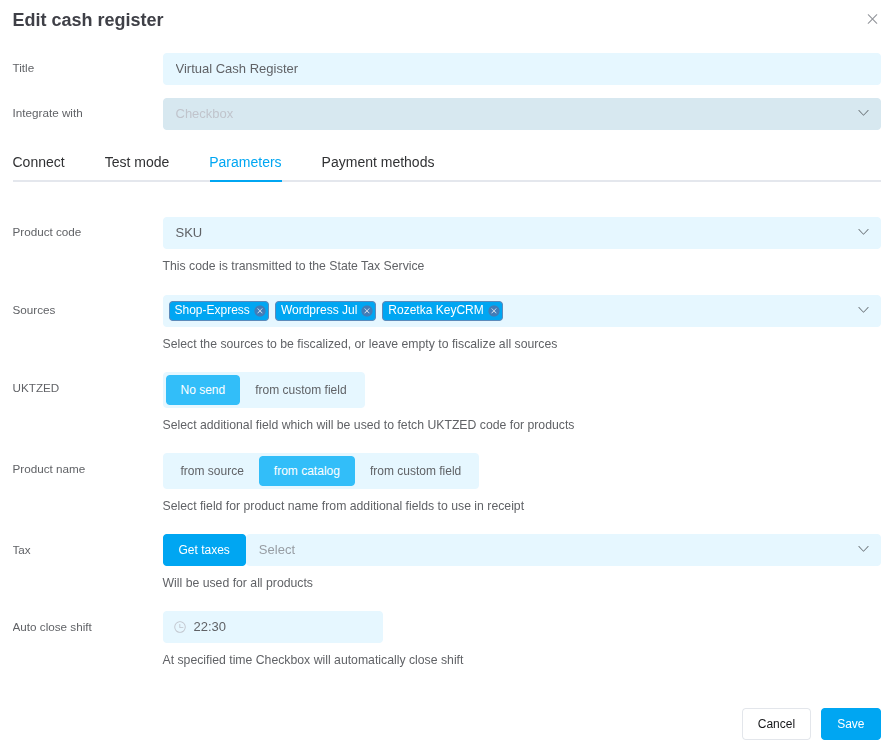
After authorizing the cashier and entering the license key, open the «Parameters» tab to configure additional settings:
-
Product code — choose which product identifier will be sent to the State Fiscal Service: SKU, keyCRM product ID (a unique code automatically assigned to every product in an order), or the product number received from the order source or connected marketplace.
-
Sources — select the order sources for which fiscalization through this cash register will be available. If you do not select any sources, the cash register will be available for all sources.
-
UKTZED — leave this field blank or select the custom field of type String or Text that contains the code.
-
Product name — select which field should be used as the product name on the receipt. You can create and then select a custom field (works for postpaid and full-payment receipts).
-
Tax — tax rates are applied to all products on the receipt. To load them from your Checkbox account, click Get taxes, then select all required rates from the drop-down list.
-
Auto close shift — specify the time at which the cash register shift should close automatically.
Step 3. Optional: Test mode
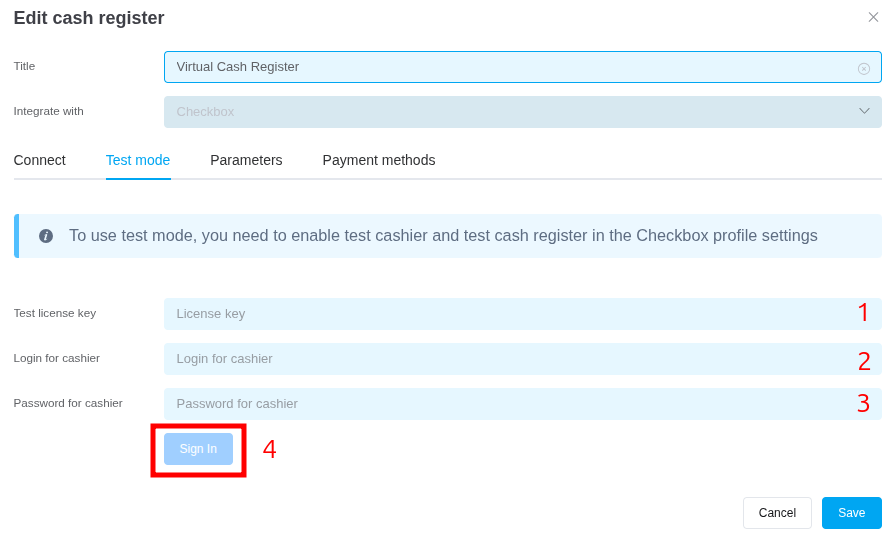
Open the «Test mode» tab. Here, you can enter test cash-register and cashier details from your Checkbox account to test fiscalization without sending data to your live Checkbox account or to the tax authorities.
If you do not add a test connection, you will not be able to enable test mode.
Note: Remember to disable test mode after testing. Otherwise, you will not be able to issue real fiscal receipts.
-
Enter the test cash register’s Checkbox license key.
-
Enter the test cashier’s Checkbox login.
-
Enter the test cashier’s Checkbox password.
-
Click «Sign In». If authorization succeeds, this block disappears. Otherwise, an error message is displayed.
Step 4. Configure payment methods
Open the «Payment methods» tab. Here, you can create additional payment methods that will be sent during fiscalization and shown on the receipt.
There are two system payment methods: «Cash» and «Card». They cannot be renamed or deleted.
Important: To issue cash receipts, you must use the default «Готівка» (English translation: Cash) payment method. The system «Картка» method (English translation: Card), as well as any custom methods you add, will be processed as cashless payments using the names you provide.
Exception: If you name a payment method «Електронний платіжний засіб», it will be processed under the «Інше» (English translation: Electronic payment instrument, Other) payment type.
To add a payment method, click «+ Add payment method» and complete the following fields:
-
Payment method — enter the payment-method name that should appear on the fiscal receipt. Examples are provided below. (see examples below in this article)
-
Fiscalization type — choose the fiscalization logic for this payment method:
• Prepaid — used to fiscalize advance payments. The receipt will contain only one item named *Prepayment for order No. ***, with the payment amount. The system uses the order number from the source; if it is unavailable, it uses the keyCRM order number;
• Postpaid — used to fiscalize cash-on-delivery payments. The receipt includes a discount equal to the prepayment amount, named *Prepayment for order No. ***. The prepayment amount is calculated as:
Prepayment = Order Total - Fiscalized Payment Amount• Full payment — creates a receipt for the full order amount.
- Payment type in CRM — select the keyCRM payment types for which this payment method should be used by default during fiscalization.
Note: This is a default setting, so select the payment types you use most often. In the fiscalization window, you can always select a different receipt name and fiscalization type.
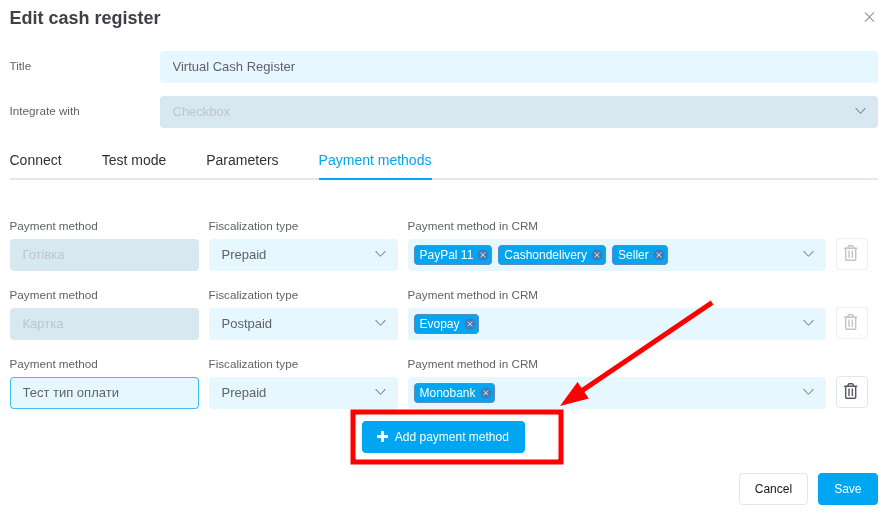
After completing the fields, save the settings. You can later edit them, add new methods, or delete added methods by clicking the trash icon.
Names for cashless payment methods
Depending on how you receive payment, use the correct payment-instrument name on the receipt—this is the «Payment methods» field in the settings.
The payment types «Готівка», «Безготівка» and «Інше» (English translation: Cash, Cashless, Other) are sent automatically.
Note: We recommend confirming the current naming requirements for fiscal receipts directly with the tax authorities or your accountant.
- «Картка, ЕПЗ, Торговельний еквайринг» (Card, EPI, Merchant acquiring) — Use this when a payment is processed via a bank card through a physical POS terminal or using Tap to Phone technology.
- «Переказ з картки на рахунок» (Card-to-account transfer) — Use this when a card payment is transferred directly to the seller’s current account (IBAN).
- «Переказ з поточного рахунку» (Current-account transfer) — Use this when a payment is transferred from the buyer’s current account directly to the seller’s current account (IBAN).
- «Оплата за QR-кодом» (QR code payment) — Use this when a payment is completed through a banking or payment smartphone app via a QR-code link.
- «Оплата через Interkassa, Portmone, LiqPay, mono checkout, NovaPay, EasyPay, Platon тощо» (Payment via Interkassa, Portmone, LiqPay, mono checkout, NovaPay, EasyPay, Platon, etc.) — Use this for online acquiring or QR payments. Note: This list is an example; explicitly specify the exact payment gateway used.
- «Оплата через PrivatMoney, Western Union, MoneyGram, RIA, IntelExpress, MEEST, Welsend тощо» (Payment via PrivatMoney, Western Union, MoneyGram, RIA, IntelExpress, MEEST, Welsend, etc.) — Use this when payment is completed via money-transfer networks. Note: This list is an example; explicitly specify the exact transfer service used.
- «Інтернет-еквайринг, Онлайн-оплата карткою» (Online acquiring, Online card payment) — Use this when a card payment is processed on a website using a direct payment gateway link (e.g., clicking a "Pay" button).
- «Сертифікат» (Certificate) — Use this when a customer pays using a gift certificate.
- «Ваучер» (Voucher) — Use this when a voucher is applied for payment.
- «Токен» (Token) — Use this when a digital token is used as the payment method.
- «Фішка» (Chip) — Use this when the transaction is completed using chips or loyalty points.
After connecting the cash register
The cash register now appears in the list of connected cash registers and can be used to fiscalize receipts. Connect any additional cash registers you need.
Note: To fiscalize payments, enable the Fiscalization field in Settings → Orders → Order Properties, and configure the required access permissions.
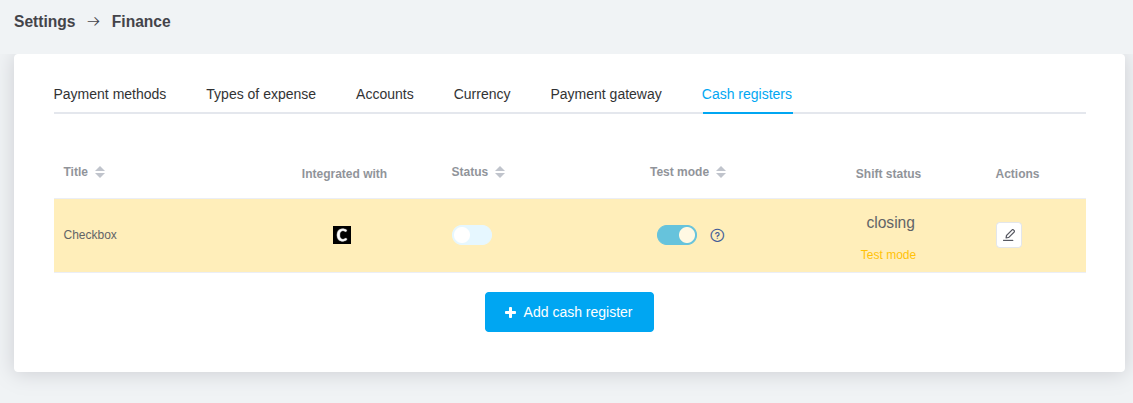
The main columns in the connected cash-register list are:
-
Title — the cash register name specified in its settings.
-
Status — a switch that enables or disables the cash register.
-
Test mode — a switch that enables or disables operation in test mode. It remains unavailable until test cash-register details are added in the cash-register settings.
-
Shift status — shows the current shift status and includes a button to open or close the shift.
-
Actions — a button for editing the cash-register settings.
Important: A connected cash register cannot be deleted. You can only disable or edit it.
Opening and closing shifts
keyCRM does not open shifts automatically. You must open them manually in one of two ways:
-
In the list of connected cash registers, click the button in the «Shift status» column to open or close a shift.
-
While fiscalizing a payment in an order, click «Open shift» if the selected cash register has a closed shift.
Opening or closing a shift may take a few seconds.
You can configure automatic shift closing in the cash-register connection settings on the «Parameters» tab.
Important: You must open and close shifts on every day when fiscalization is performed. A shift can be opened at any time, but it must be closed by 23:59 on the day it was opened.
Updating the connection or changing the cashier
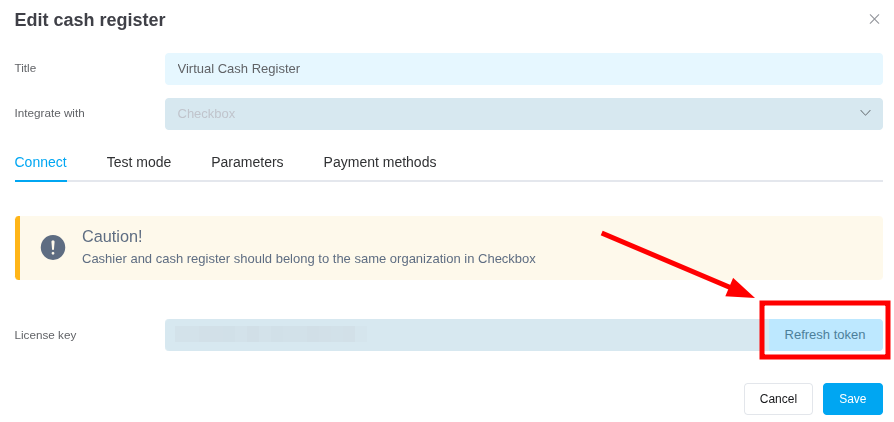
Open the cash-register editing screen and click «Refresh authorization» next to the license key. Then enter the login and password of the cashier you want to connect, as you did when creating the cash register.
Sending receipts to the customer by email
Checkbox automatically sends receipts to customers whose email address was specified in keyCRM at the time of fiscalization or fiscalization cancellation.
Tags: Checkbox, check box, receipt, fiscal receipt, fiscalization, virtual cash register, cloud-based POS, chekbox, checbox, chek, PRRO
