The accounting features allow you to track your finances directly within the CRM, giving you a single view of all income, expenses, and balances — convenient, transparent, and without the need for external spreadsheets.
Where to find the list of accounts
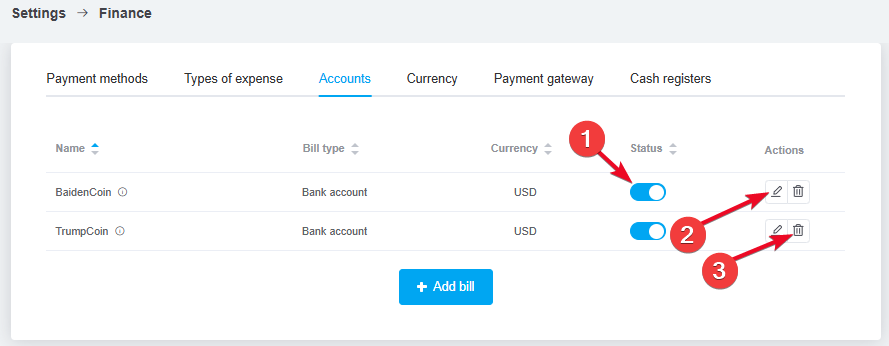
Go to «Settings» → «Finance» → the «Accounts» tab, where you'll see a list of all your added accounts. You can sort the list by clicking on the column headers.
Below the list is a button for adding new accounts. You can create up to 100 accounts; after that, the add button will be disabled.
How to create an account
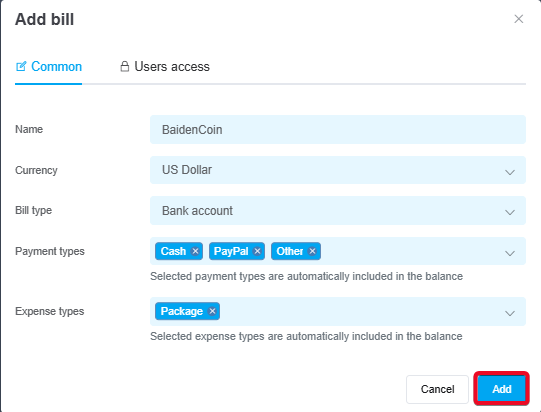
To add a new account, click the «+ Add account» button. In the window, fill in the fields:
-
Name — enter a name for the account that makes sense to you;
-
Currency — select a currency; you can add more currencies or set exchange rates in the settings;
-
Bill type — choose from: Bank Account, Cash, Location, Cryptocurrency;
-
Payment type — select the payment types from which funds will be automatically credited to this account's balance;
-
Expense types — select the expense types; expenses associated with them will be automatically debited from this account.
User access to the account
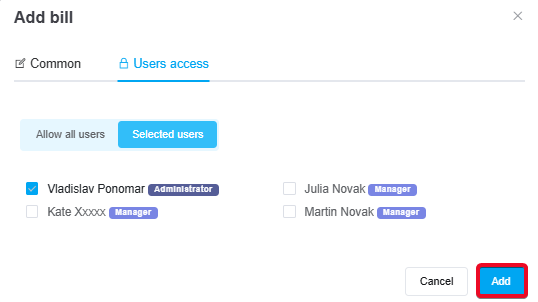
In the «User access» tab, you can configure which employees will have access to a specific account.
To do this, click on «Selected users» and check the boxes next to the employees.
-
Administrators always have full access to all accounts—it is impossible to revoke their access;
- Selected users can view:
• the account balance;
• transfers and adjustments related to the account in the payment journal. -
Non-selected users cannot view account data, but can select an account when manually creating payments or expenses.
After clicking the «Add» button, the account will be saved to the list and will be available for use.
Account management
In the list of accounts, you can:
-
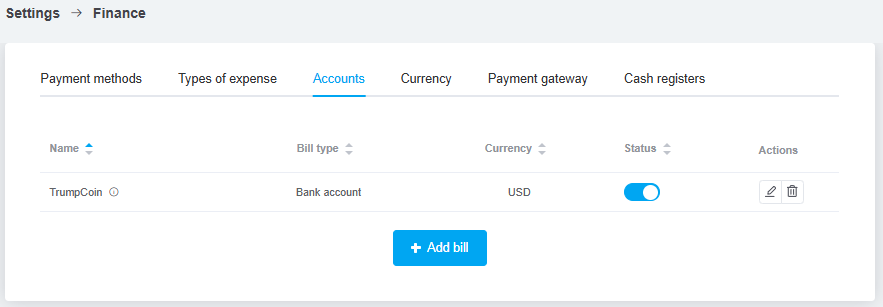
Enable/disable an account by clicking the toggle switch in the «Status» column. A disabled account is hidden throughout the system, but all data is saved, and you can enable it at any time.
-
If all accounts are disabled or the user does not have access to them, the account section in the payment log will not be displayed;
-
Edit by clicking the pencil icon, which opens the same window as when creating an account. You can change: the name, type, payment methods, expense types, and access permissions;
-
Delete the account by clicking the trash can icon:
-
The link to transactions associated with the account is broken, but the transactions themselves remain;
-
Payment and expense types associated with the account become available for selection in other accounts.
Important! A deleted account and all associated data cannot be recovered.